Blog

Using Sony α6500 as a webcam on OSX Catalina without HDMI capture card

With a lot of us working from home, many companies and individuals utilize videoconferencing software like Zoom, Microsoft Teams, and Skype. Most computers have built-in webcams, but when you’ve got multiple meetings every day, it doesn’t hurt to present yourself in crisp HD instead of a faded, looking-up-your-nostril blur of motion.

With that said, it’s pretty easy to use the DSLR you already own as a webcam. This writeup is for setting up a Sony α6500 on MacOS Catalina using USB instead of HDMI capture, but will probably work on any Sony DSLR (not tested though).

Prerequisites

  • Camera-Live – provides a Syphon server for a connected camera, allowing it to be used as a live video feed (the Github page says it’s for Canon DSLRs, but apparently works for Sony DSLRs too. Maybe other brands as well)
  • OBS – uses the Syphon server data as input
  • OBS virtual camera plugin – enables OBS output to be recognized as “webcam” by Zoom, Teams etc.
  • USB data cable – this needs to be a data cable and not just a charging cable.
  • Optional: AC charger for your camera – I used a Sony PW-20 just because I didn’t want the battery to cook itself while it was on for an extended amount of time.

If you’re using Homebrew, you can install the above software at once with:

brew cask install obs obs-virtualcam camera-live

Once all of the software is installed, check your camera settings and change the USB Connection mode to PC Remote. (See here for more info)

Connect your camera to your computer with the USB data cable. Once it’s connected, Camera-Live should recognize the camera like so:
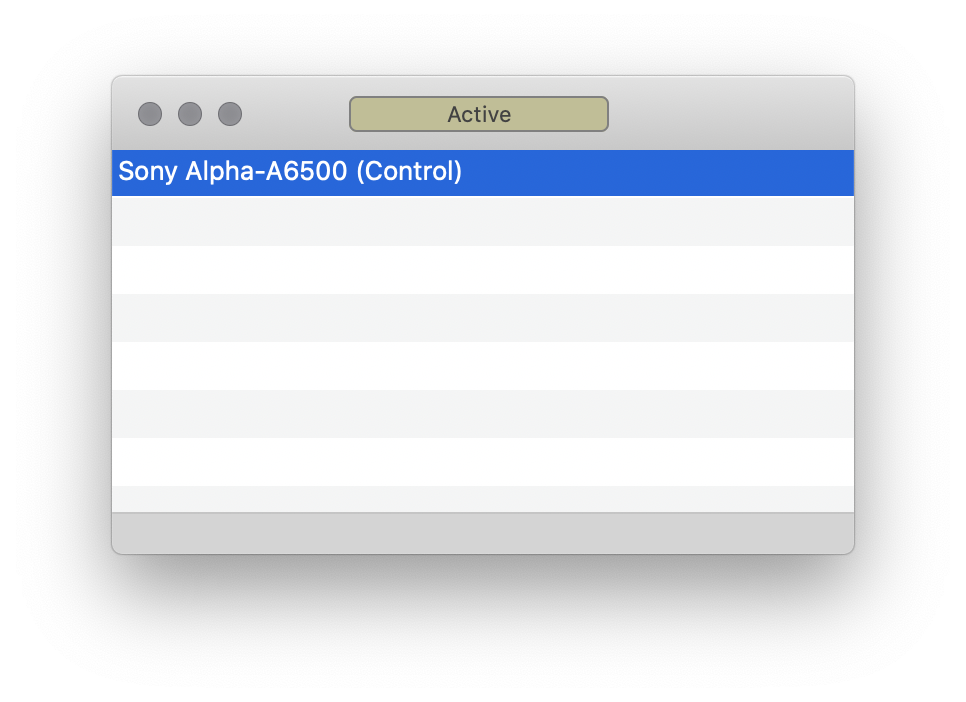
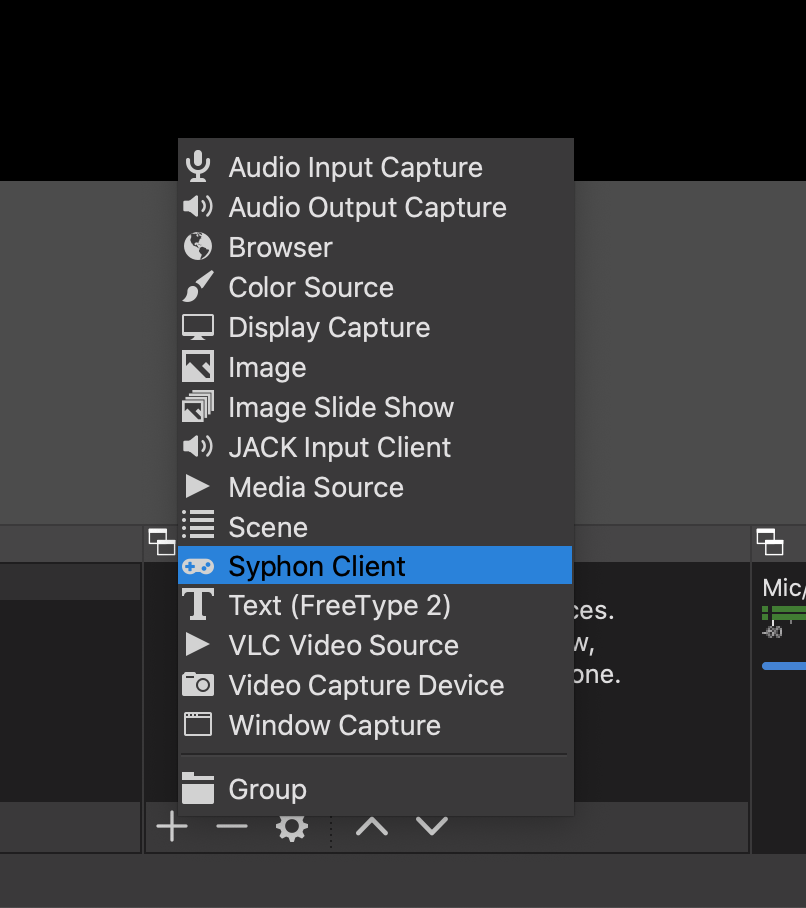
With Camera-Live open, start up OBS and add the Camera-Live feed as a Syphon client:

Once you’ve added the source, you should be able to see the camera’s feed on screen. Adjust feed size as necessary.
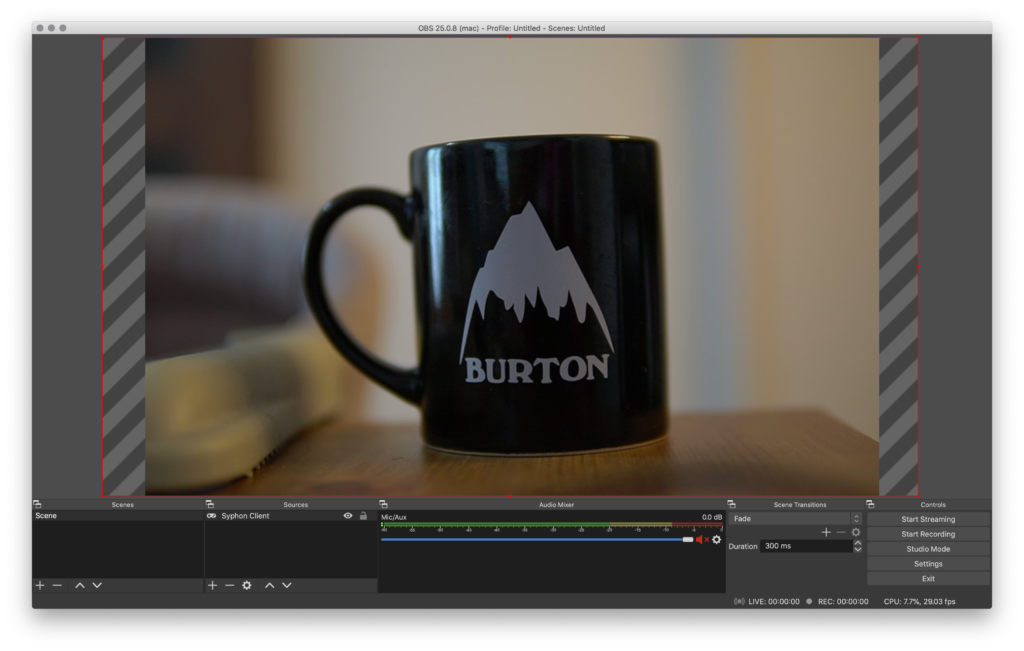
Once that’s done, start your virtual camera plugin by [Tools] -> [Start Virtual Camera].
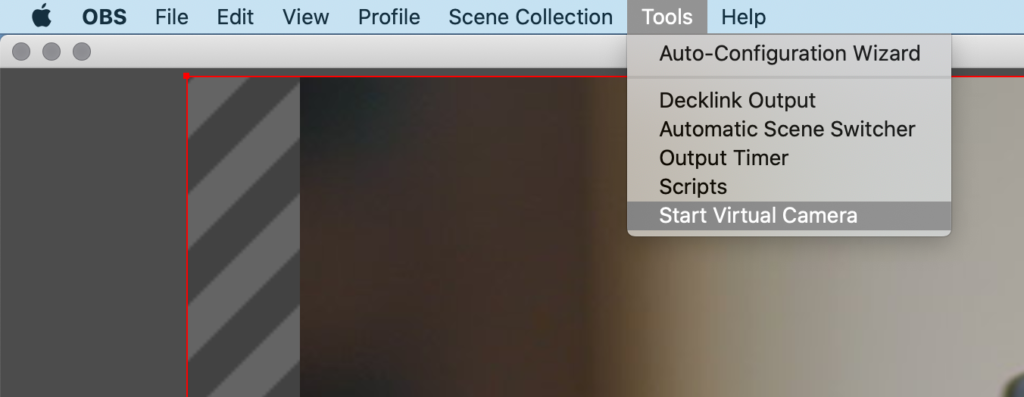
Your camera’s feed should now be recognizable as a webcam in videoconferencing apps.

If you’re using Zoom, you may have to remove the official signature from Zoom to allow for it to recognize OBS as a camera device.

Close Zoom if you have it open, then enter the following in Terminal:

sudo codesign -f -s - /Applications/zoom.us.app

To check your feed, open up your videoconferencing app and take a look at the camera settings. For Zoom, open Settings->Video.
In the Camera dropdown, you should see OBS Virtual Camera Device.
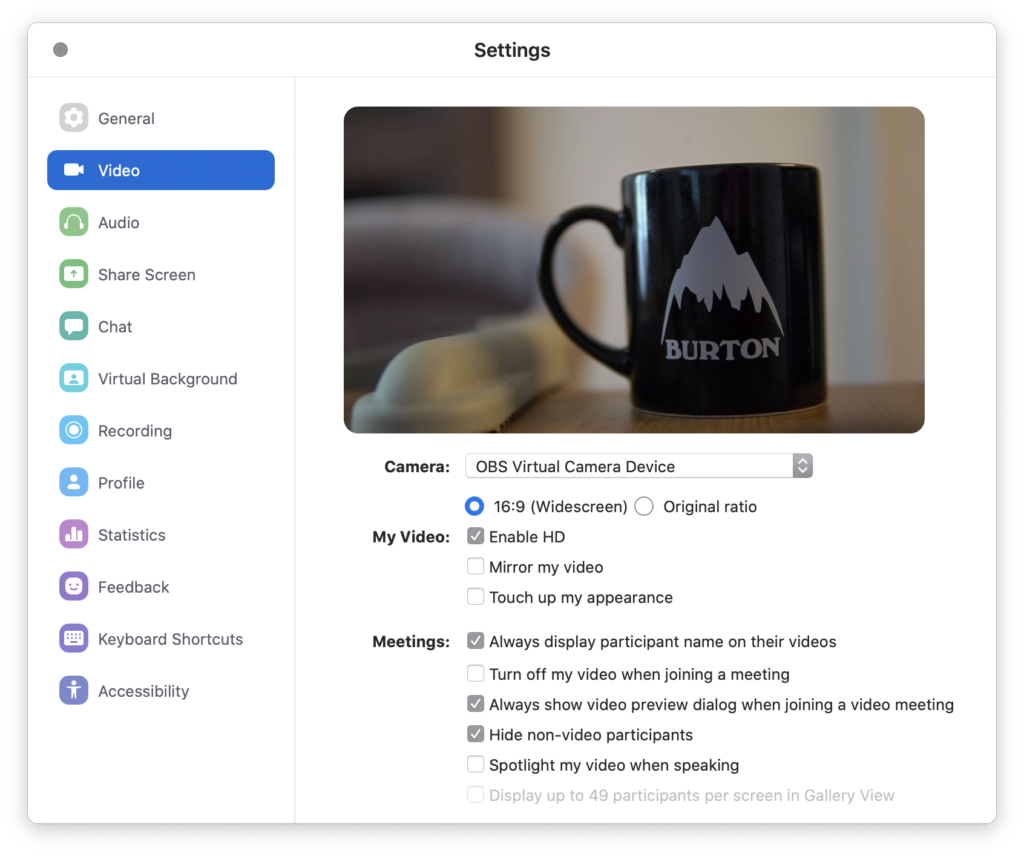
You’re all set to start looking pretty for your meetings!
Setting up WDB-433SU2M2 driver for Raspberry Pi 1 Model B

A lot of tutorials for setting up a driver for WBD-433SU2M2 were partial or broken due to old versions of NPM, so here’s a new writeup.

1. Setting up RPi

My RPi is a Model B Rev 2.0, which meant that it doesn’t have on-board Wi-Fi. I bought a super-cheap Elecom WDB-433SU2M2 for something like ¥900, but the only driver on its website is for Windows only.

The adapter uses Realtek RTL8821AU chipset, so what we can do is use its driver to compile it for Raspberry Pi.

RPi setup

This writeup uses the most recent Raspbian image (2019-09-26). See here for tutorial on how to set up your RPi.

After all that’s done, update your RPi.

$ sudo su
$ apt update && apt upgrade -y

Now check the kernel version of your device.

$ uname -a

Linux raspberrypi 4.19.93+ #1290 Fri Jan 10 16:34:37 GMT 2020 armv6l GNU/Linux

Note the version number 4.19.93+. This is the kernel header you want to use.

Get kernel source

$ apt install raspberrypi-kernel-headers
$ cd /usr/src
$ sudo ln -s linux-headers-4.14.79-v7+ linux
$ ls -la
total 16
drwxr-xr-x  4 root root 4096 Jan 23 18:19 .
drwxr-xr-x 10 root root 4096 Jan 23 18:19 ..
lrwxrwxrwx  1 root root   25 Jan 23 18:23 linux -> linux-headers-4.14.79-v7+
drwxr-xr-x 24 root root 4096 Jan 23 18:23 linux-headers-4.14.79+
drwxr-xr-x 24 root root 4096 Jan 23 18:23 linux-headers-4.14.79-v7+

Now get driver from git

$ git clone -b v5.6.4.2 https://github.com/aircrack-ng/rtl8812au.git
$ cd rtl*

Change headers in Makefile with below

$ sed -i 's/CONFIG_PLATFORM_I386_PC = y/CONFIG_PLATFORM_I386_PC = n/g' Makefile
$ sed -i 's/CONFIG_PLATFORM_ARM_RPI = n/CONFIG_PLATFORM_ARM_RPI = y/g' Makefile

Once you’re done, compile

$ make
// should take something like 15 min
$ make install

After the driver is installed, confirm with:

$ dmesg | tail

Flying drones in Japan – quick guide

With the increase in need for aerial footage in various industries, drones are becoming an indispensable tool for a lot of photographers and videographers. Here are some things to consider when looking to shoot footage with drones.

There have been quite a lot of accidents and incidents involving drones in Japan – in 2015, someone dropped a Phantom 2 laced with radioactive dirt on top of the Prime Minister’s residence. Because of that, a whole lot of regulations and laws were passed to enforce drone usage in Japan. In order to fly without permission, these requirements have to be met:

1) Drone weighs less that 200g (about 7 ounces)
2) Drone will fly no higher than 150m (about 490 feet) from the ground (will get into in another post)
3) Drone will not fly within protected airspace (airport, helipad, certain gov’t properties)
4) Drone must not fly within DID (Densely Inhabited District)

So for example, the Tello, since it only weighs 80g (2.8oz), can be flown as long as they meet requirements 2 and 3. Whereas the DJI Spark can’t be flown unless they meet this additional requirement:

Where is this DID area? It can be found on this map, but you’ll see something interesting:

DID drone map japan tokyo

The red area is what’s considered DID, and is based on the past year’s census. Almost all of Tokyo’s 23 district is restricted.

In order to fly around Tokyo, you’d need to get out to where it’s not red, and make sure to follow the 4 requirements outline above.

But obviously, these aren’t the only laws you need to follow – which I might go over in another post.

DJI Phantom 4 Pro – 1日でわかったKarmaとの違い

今年の5月ごろにGoPro Karmaドローンを購入して、5ヶ月ほど、山から海、伊豆からハワイまで色々な所で撮影しました。
割と気に入っていたKarmaドローン(以下Karma)ですが、「ドローンを使うならちゃんと知識つけたいな」という思いでDJIのイベントに参加してみました。

そこで、ドローンで写真の作品を手がける別所隆弘さんと、映像作家の方(バカなので名前を失念…)のお話をお伺いしました。

「ドローンで撮るなら普段と違う視点で」

「カメラで取れるアングルは意味なくない?」

おっしゃる通りです。
まんまとドローンの可能性により引き込まれました。


昔から格好から入る性格なので、早速DJI社のハイグレードドローン、Phantom 4 Pro(以下P4P)とKarmaの比較をしてみました。


【Karmaの利点】

  • アームを格納できる
  • ジンバルを取り外し、手持ち使用できる
  • コントローラの画面が明るく、非常に使いやすい
  • 割とコンパクトな専用ケースが付属される
  • iPhoneなどに写真、動画を簡単に転送できる

【Karmaの欠点】

  • バッテリーがやたらでかく感じる。複数持ち運ぶのは面倒?
  • プロペラの取り付けに専用工具が必要(なくてもつけれるが怖い)
  • ケース機材しか入らない(充電器を抜かない限り財布すらしまえない)
  • カメラがGoProなので、画質に限界がある(F値2.8固定、センサーサイズも1/2.3インチ)
  • 操作するには専用コントローラが必要


【P4Pの利点】

  • 画質が良すぎる(Cinematic 4K 60p@100Mbps – H.264時)
  • フライト時間が比較的長い(たかが3分、されど3分)
  • フライト中にカメラ設定が簡単に行える
  • コントローラのスティック操作がスムーズ、かつボタン設定をカスタマイズできる
  • プロ感がある(見た目から入る人必見)

【P4Pの欠点】

  • でかい(Karmaに比べると幅と高さがある分、短い。正方形:長方形)
  • カメラが機体に固定されている
  • 全体のインターフェースが分かりづらい(よく言えば変更できる設定が多い)
  • コントローラがなかなかWi-Fiを見つけてくれない(個体差?)


結論から言うと、

「Karma = 高価なおもちゃ」

「P4P = お手頃な撮影機材」

コンデジと一眼レフの違いかな。

DJI社とGoPro社のドローンに対する熱量も、UIやウェブサイトを見るとわかる。もちろんドローンをメインに作っているわけではないが、飛行禁止区域での空撮を自動的に禁止させる装置も、ドローンの名を汚さないための仕組みで、しっかりしている。


さて、あれこれ検討していたら、なぜかカートの中にP4Pが…いつの間にかカード決済されて…

気づいたら家に届いてました。(舞い上がって写真撮り忘れた)

実際に初めてP4Pを飛ばして、瞬時に画質の良さが歴然。
日の出を撮ろうと思い葉山へ来てみたが、案の定寝坊。上る所は取れなくても、岩場で休む鳥の群れを発見。
やっぱり画質は圧倒的に良い!Karmaの最高画質で撮ってもディテールを残すのは難しかった気がする。


「コスト」「柔軟性」「持ち運びやすさ」を選ぶならKarma。

「画質」「操作性」「プロ感」を求めるならP4P。

いずれにせよ、両方ともすごい楽しいので、イベントなどで試してみてはいかが?

P4Pが予算的に厳しければ、Mavic や Spark でも楽しめるはず!

ローカルでのウェブ開発環境構築(メモ)

ローカル開発のために、複数システム上で同期する開発環境を設定しました。
出展:A Perfect Web Development Setup for your Mac – Chris Mallinson

まずツールが使えるように、Xcode developer command line toolsをインストール。

xcode-select --install

インストールしたら、一度Xcodeを起動しておく。

次に、Homebrewをインストール。イケてるパッケージマネージャー。

ruby -e "$(curl -fsSL https://raw.githubusercontent.com/Homebrew/install/master/install)"

そしてデータベース。MySQLをダウンロードし、ローカルにインストールする。

このdnsmasqってのが最高。サブフォルダごとにドメイン割り当てをして、トップレベルドメインを自分で設定できちゃう。
自分の場合、Dropboxを使ってパソコン間でも開発できるように、Dropboxのフォルダをルートに設定します。

dnsmasqはさっき入れたHomebrewを使ってインストール。今回は.devドメインにしますが、好きなやつを使ってもよし。

brew install dnsmasq
cd $(brew --prefix); mkdir etc; echo 'address=/.dev/127.0.0.1' > etc/dnsmasq.conf
sudo cp -v $(brew --prefix dnsmasq)/homebrew.mxcl.dnsmasq.plist /Library/LaunchDaemons
sudo launchctl load -w /Library/LaunchDaemons/homebrew.mxcl.dnsmasq.plist
sudo mkdir /etc/resolver
sudo bash -c 'echo "nameserver 127.0.0.1" > /etc/resolver/dev'

それが終わったら、Apacheの設定をします。
Apache用のフォルダは存在するけど、Dropboxで複数システムで共有したいので、Dropboxのフォルダを/wwwに設定することにしました。中はこんな感じ:

/www
    /home (ローカルサーバー上のサイトを一覧できるように。あとで説明します)
    /Dropbox(Dropboxの設定で、場所を/wwwに変更しておきます)
        /site1
        /site2
        /site3

Terminalを開いて、

sudo apachectl start

と打ちます。

それができたら、http://localhostに飛んだら”It Works!”と表示されます。これでApacheの設定はおしまいです。

Interview by Be Inspired! – What it means to be Japanese in America

Original text: Be Inspired! Global

width="100%"
ーどれくらいアメリカに住んでいましたか?アメリカのどこですか?

アメリカのイリノイ州、シカゴ郊外のネーパービルという所に9年ほど居ました。

ーアメリカの好きなところはどこですか?

選択肢が多いことだと思います。普段の食事から娯楽、進路、どこで誰と何をするかまであらゆるオプションが用意されています。もちろん日本でこのように選ぶことができないわけではないですが、明らかにバラエティが違うと思います。アメリカがこのようになったのも、多民族国家だからだと感じます。

ーアメリカの嫌いなところはどこですか?

差別や偏見は他の国より多く見受けられると思います。様々な人種が集まるなか、「自分が一番」という国民性によってお互いに対する差別はかなり感じます。

ーアメリカで“日本人”でいていいことは?

良くも悪くも、日本人は真面目です。アメリカで真面目に仕事や遊びに打ち込むと、一際目立ちます。これこそ偏見かもしれないですが、適当に物事を進める社会で日本人っぽく真面目に仕事をすると、「そこまでやってくれるのか!」と喜ばれる気がします。

width="100%"
ーアメリカで“日本人”でいるのが嫌なときは?

日本人に対する差別は、小さい頃は少なくとも私が住んでいたところにはありました。白人、黒人、メキシコ人が圧倒的に多い国では、アジア人はマイノリティーです。肌の色でいじめられたり、アジア人だから勉強ができるだろと言われたりもしました。

ーアメリカにいて自分が“日本人”だと強く感じるときはどんなときですか?

私自身は割と不真面目な方だと思いますが、アメリカ人に比べてしまうとかなりシリアスな人だと思われる気がします。アメリカのテレビ局と仕事をすることがあるのですが、彼らは「まあ、どうにかなるだろ」とかなり適当に仕事をしている気がします。そのなか、私は普段通りに手配や連絡などをするのですが、比較すると仕事に対する意識や態度が180度違うな、と感じます。(それで普通にアメリカでかっこいい番組が作れるのは、もはやセンスの違いなんでしょうね)

ーあなたにとってアメリカで“日本人”でいるとは、どういうことですか?

日本人としてアメリカにいるということは、他の国や人種の人々と共存しなければいけないということです。力強く、自分を持って生きないと多様な文化や風習に飲み込まれてしまいます。

ーあなたにとってアメリカで“日本人男性”でいるとは、どういうことですか?

アメリカでは、日本人の男性は他の人種に比べて草食的で控えめなイメージがあると思います。上の設問と同じですが、己を信じてガツガツとしないと、取り残されてしまいます。

今回Be inspired!はVOL.1、VOL.2と2部で、アメリカで育った4人の“日本人”にお話を聞いた。これはあくまでも個人の体験だから、全てのアメリカに住む日本人、日系アメリカ人、アメリカ人に当てはまるわけではない。それどころか、インタビューを受けてくれた4人ですら、とても違う経験と意見を持っているように感じた。性別、セクシュアリティによっても体験は変わってくるのかもしれないし、性格、環境、アメリカのどこか、によっても異なってくるのかもしれない。

4人の体験を読んだみなさんのこれまでの経験によっても、共感するところや、新しい発見は違うだろう。それでも日本を今生きるみなさんが彼らのストーリーを通してそれぞれの形で、「日本人でいることは何か」を見つめ直すきっかけとなり、それ以上に何かを考える機会となっていれば幸いだ。

Source: Be Inspired! Global